Showing posts with label home. Show all posts

Friday, September 10, 2010

Upcycled Transformation


Every fall our chuch has it annual parish festival. It is our biggest fundraiser of the year, and it is next Saturday.

Many years ago I started a "silent auction" as part of this event.  Calling local businesses and other parishioners asking for donations and organizing the entire event.  I am no longer in charge of it (by choice!) but I always dontate something to it, 

Here is my donation for this year...


It started out as these bits and pieces... 

... an old school desk that was originally in our parish school.  The school sold these for $5 each a few years back.  My neighbor was done with hers, she put it in her trash - and I took it! 

I am not too proud to take something out of the trash for a good cause!


... this stool, that I picked up at a local thrift store for $1 yesterday.  It was covered in rust and quite dirty, but I saw it had potential as a chair for my little desk.


... metal desk accessories, I found at Dollar Tree for... you guessed it... $1 each.


... some regular yellow pencils I covered with oragami paper (had both of those things too!) based on this tutorial I found Omiyage's blog (you can check it out here) ...


... some cute school supplies,
... a couple cans of spray paint (half of which I already had in my stash!)...


... some buttons and magnets (once again, I already had these too!) to use to hang paper and what-not from the metal sides of the desk...

... some ric rac around the bottom of the legs (had it)...


 ... and some fabric and batting (guess what... I had those already too!)...


Total out of pocket cost for this project:  $19!

I think it turned out quite cute!  

I hope that it will find a home and bring in some much needed cash to our church and school!  

 
What little girl wouldn't love doing her homework at this?

Wednesday, June 9, 2010

Before and After... Well, Really During!

This is the front of my house.  It really needs a new look.  It has 30+ year old aluminum siding that has chalked and faded in stripes (look at the second story - that is not shadows, that is siding that has changed color, but only in some places!).  The whole thing really needs resided or painted.  Neither of which is in the budget for this summer.

It also has a reddish roof (which I have always hated) and a hard to color coordinate - almost white washed - brick on the front lower center section.  It had, I say, "Terracotta", most say "peach" color shutters - which I never really liked, but they were suggested by the landscape architect we hired to design our front gardens and porch addition, and they matched the brick and roof.  So they have stayed for the past 13+ years!  I guess I needed to get my money's worth out of that suggestion we paid good money for!
So, in light of all of its challenges, I have and decided to make the best of it...

The easiest, quickest and cheapest way to change the look of a house... shutters!  I got on Benjamin Moore's website and uploaded a picture of my house and played around with different shutter colors.  (warning - this can be addictive!).   I have kind of gone out on a limb with the color, but I was so tired of the "matchy/matchy" color we had, and it really did look the best with what I had to work with.
Can you say... "purple shutters"!  I know it is quite a statement!

But they really do look good against the brick, and they make the roof look redder than it actually is and I don't hate it so much!
I still have the problem with the vertical siding fading/chalking on the second story, which my hubby says he is going to paint this summer - just that section - we'll see how that turns out!  I guess it really can't look worse than it looks now, so "what the heck" - a couple gallons of paint - just don't fall!
But all things considered, I really do like the change!  I can't wait to have it all finished.  I have shutters on every window of my house, and the front door.  26 shutters to be exact, and right now I only have 12 finished!  And to make matters worse, most are really tall - like 6' tall shutters!  I still have a ways to go, but will be happy when it is done!

Now I need some suggestions for a new door color and maybe even something for the garage door.  If you have suggestions, please leave them in a comment!  I really am stumped on these 2 items and need some help!

The shutters repainted, a new front light fixture and some new house numbers to be installed, hubby painting the upper portion of the house and I will call this "make-over" done for this summer!

I'll post more pictures when it is done!

Friday, March 26, 2010

Some Snippets from our Office Re-Do...

We (hubby and I) have been working on re-doing our dining room/home office for the past month or so.  As with every home improvement project we undertake - it is taking longer than we had hoped for or anticipated.

But wanted to show you some of the things we have accomplished in this time... (but please ignore all the mess in the background of these pictures... most if not all of what you can see will be gone when the room is done.  Also ignore the poor quality of the pictures - I had to use my cell to take the pictures - couldn't find my real camera right now!!!)...
This is the worktable for the center of the room.  It will double as a dining table when needed for that purpose (about 3 times a year if we're lucky!).  The size is a generous 3' wide by 7 ' long!  The bases are 4 file cabinets we bought and assembled that I blogged about here.  The design for this worktable has changed slightly, but the concept is still the same.   The table top is so solid - it has (5) 2" x 4"'s running the length of the table as support, and the apron/trim piece we added to hide all that allows the top to sit over the file cabinet bases so it doesn't slide off and keeps the 2 "back to back" file cabinets together.

We modified the file cabinets a little...
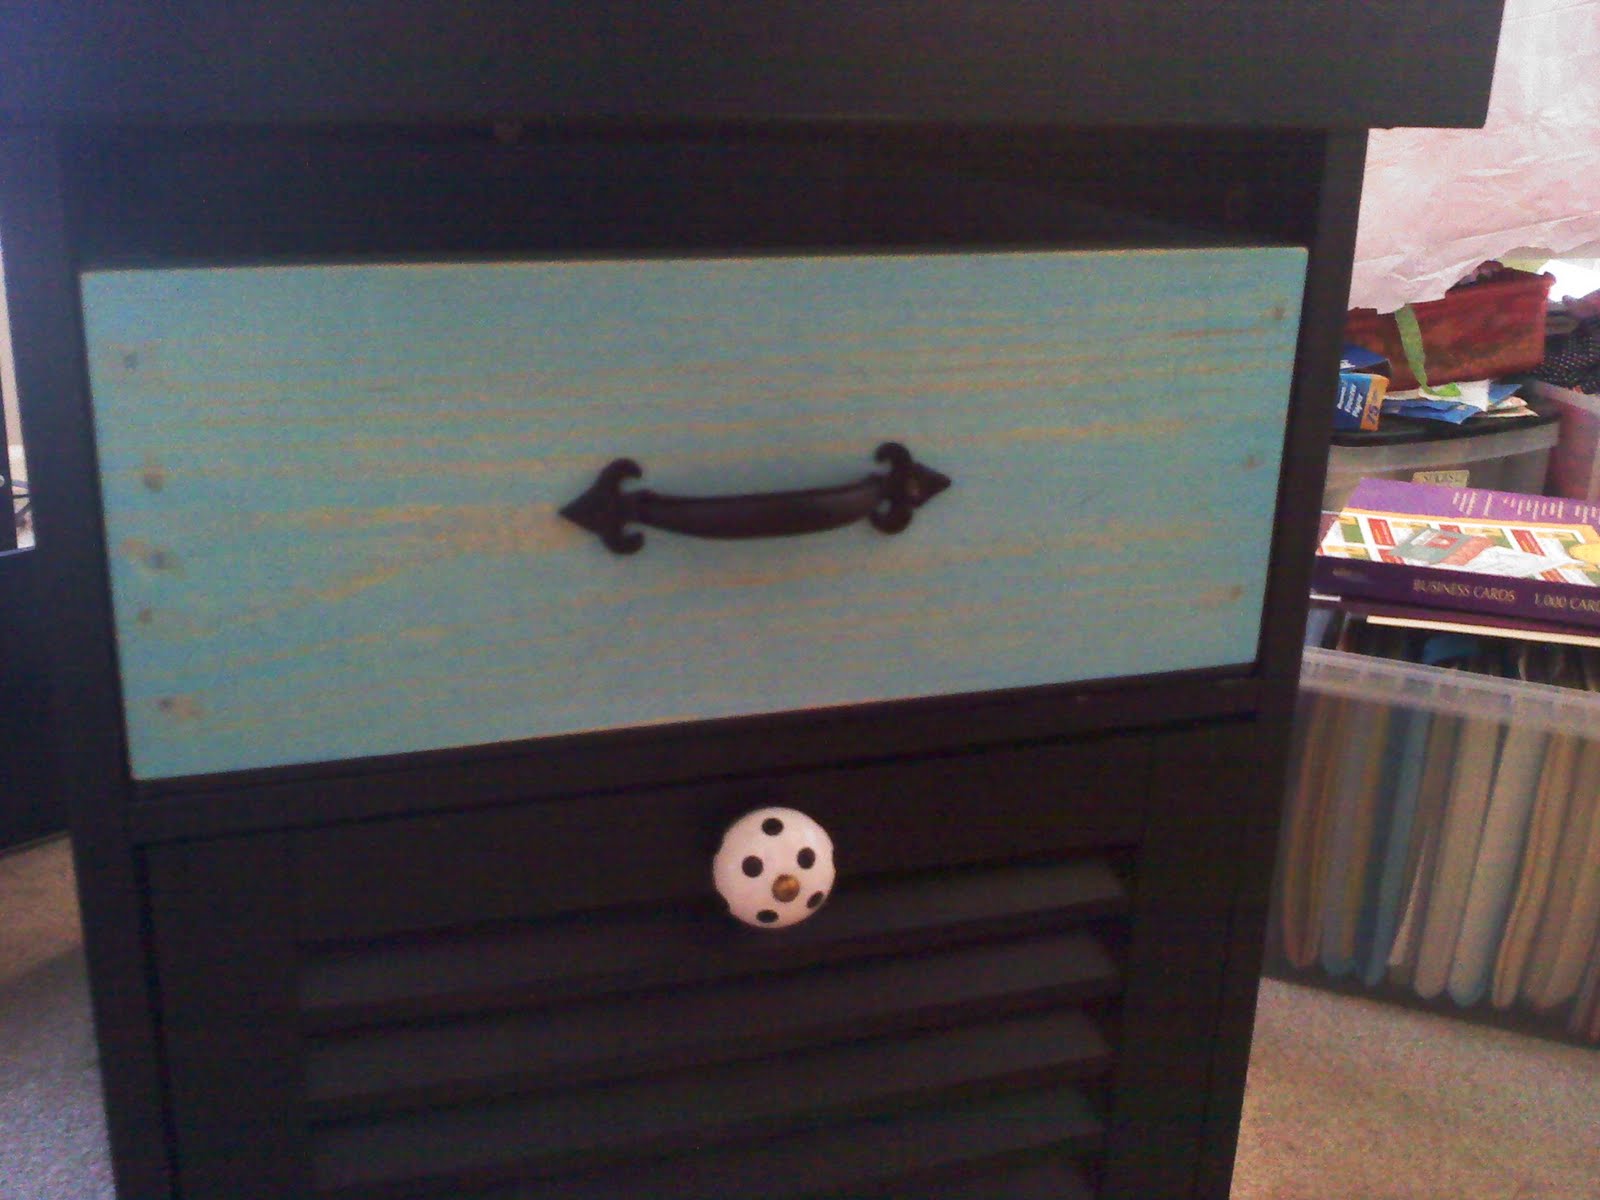
We changed the boring silver knobs they came with to these fun polka dot ones - if you know me, you know I am a sucker for polka dots!  We also added a drawer/box to the open slot above the file drawer also with some fun hardware... 
We made these drawers ourselves with our new nail guns and compressor we bought to make our next project, that you can read about here.  The drawers/boxes come all the way out - our thought was that they would be like project boxes, to store stuff you are working on, and could take the whole box, to another location if need be to work on, and we purposely made the box a little shorter then the space so that you could just slide stuff in and out without having to "open" the drawer. The drawers are stained this beautiful pale aqua blue.

The secretaries we are building  next from plans we got from Ana at Knock off Wood will be stained the same aqua .  If you have never checked out Ana's blog, do yourself a favor and stop by!  She has FREE plans for all types of wood furniture that you can build yourself.  And she is so inspiring and empowering.  Even if you have no desire to build your own furniture, check out her blog and see all the awesome things she and her readers have built.  But be careful you may get bitten by the bug and decide to go out and buy yourself one of these...
Our latest addition...  I have to say it really is fun! 


I got this cabinet at a local thrift store for $5 about a year ago.  It has been in our family room storing dog stuff, and was painted a cream color with big burn marks on the top.  I forgot to take a before picture the other day, but believe me when I say, it needed some TLC.
A nice coat of satin black paint to match the table, and the same cute polka dot knobs and we're done!  This will actually be the printer stand, but the lamp I blogged about here looked so cute there, that I put it there for the picture!!

The red pencil/office supply organizer was on old kitchen utensil organizer I bought for $0.25.  It looked like this before a couple coats of red spray paint for plastic.  It has a lazy susan bottom too!


The last thing I have to show you today, is the chandelier that will hang above the big worktable.  Pay no attention to the fact that it is hanging crooked, the ground wire is not connected, and the plate that is suppose to be on the ceiling covering all the wires is hanging there, I was in a hurry to see how it would look...
The other thing you should know about me is that I love old blue Ball canning jars!  I pick them up at every thrift store and garage sale I find them in.  Most I have picked up for less than $1! After I bought this thrifted chandelier that I picked up for $8, none of the standard glass "shades" would fit on it so I thought... Blue Ball Jars!!  I think it was suppose to have some big glass round globe type bulb covers.

I was afraid that the Ball Jars would overheat and the glass would shatter, but it has been up for several weeks and no problems so far.  I think the fact that they have some venting in the top helps!  The fixture itself was ugly 70's shiny brass, but a coat of primer and  two of  "oil rubbed bronze" spray paint was all it took to take care of that problem. 

Imagine my surprise when I saw this one at Panache Lighting a couple weeks after I made mine...

It is a little too much for me, along with the price tag of $1300!!  Mine cost me a total of about $20 including the fixture, primer, paint, new screws, new swag chain, ball jars, and light bulbs!

Well, it is time to put another coat of poly on the other 3 drawer/boxes, so I must run.  We will post some progress of the secretary desks when we start those!

This post is being shared on DIY Day at A Soft Place to Land, Toot Your Horn Tuesday @ A Silly Little Sparrow, Talented Tuesday @ My Frugal FamilyTrash to Treasure Tuesday @ Reinvented, Get your Craft on @ Today's Creative Blog, Nifty Thrifty Tuesdays @ Costal Charm

Friday, February 26, 2010

The Bathroom Reveal...

This was one of those projects that just seems to take forever.  It was suppose to be a QUICK weekend project.  Well, about a month later, it is for all intents and purposes complete.  There are some areas I need to touch up the paint, and the towel bar needs re-installed (I think one of my kids tried to do pull-ups on it and ripped it out of the wall!)  But done enough that I can post some pictures of it...

Just to remind you what the bathroom looked like before starting this project...
(Before)

 Before I give you the big picture, I want to show you a few of the small items that have made this room.  
The soap and lotion dispensers were cheap $2 dispensers from Wally-World.  I had these vinyl decals made for them by Leen the Graphic Queen.  I did a rough sketch, and she made them look awesome.  You will see lots more of her work coming up.  The toothbrush holder was a gift from a friend.  She too is doing lots of work in her house this winter.  She spotted this when she was at the store looking for stuff for her bathroom, and picked it up for me - Thanks Jenny!  The bathroom cup is an old enamelware mug I picked up years ago and it just looks so cute in there.

All the doorknobs in your house are the cheap, ugly, 60's bright polished brass variety.  It is one of those things I look at all the time, and think I need to do something about, but the thought of spending $20 per knob set (when I would need 14 sets for the entire house ~ $300!) just didn't seem like a good spend.
(Before - ugly brass)
So I turned to my old trusty friend - "Mr. Spray Paint", in an oil rubbed bronze variety, and here is what the bathroom one looks like now...
 (after - Oil Rubbed Bronze)
Not bad, huh?  I am very happy with how it turned out.  If the paint holds up on it, I will be painting all the knob sets in our house!

My $20 Craigslist faucet, that took a whole day to install...


Another small detail that has really made a big difference in the room is the trim...
(before - ugly trim)
(after - metallic silver!)

The flooring also made changed the whole look of the room.  When you have, what I am 99% sure is old vinyl asbestos tile in your house, you have some challenges when it comes to changing the flooring.  If asbestos tile in in good shape (as ours is) you are best to leave it alone, and not take it out.  However, when it looks like this...
you may not want to keep it visible.  This same ugly tile is not only in our bathroom, but a hallway and the laundry room.  We were not ready to change the entire area for a variety of reasons, so we had to do something of a more temporary nature with it just in the bathroom.

So a $17 piece of black of indoor/outdoor carpet, and some double stick carpet tape and a cute silvery grey bathmat, and you get this...
(please ignore the white flecks on the carpet - I forgot to vacuum before taking the picture!)

Lighting also helps to completely change a room... We went from a fixture centered over the toilet with 3 - 40 watt bulbs to one centered over the  mirror with 2- 100 watt bulbs (we put a dimmer on it so that you didn't burn your retinas when you got up in the middle of the night to use the facilities!)

Well, I've kept you waiting long enough, here are the rest of the pictures, of this tiny bathroom in its full glory...

Aren't these vinyl wall decals the best!  Leen made these custom paisleys and polka dots for me.  She did an awesome job - they really complete the room.

And this is the mirror that I designed, had the glass custom cut, had hubby cut the plywood backing, and then I assembled!  I LOOOOOOOVE how it turned out!
Hope you have enjoyed the trip around our 6' x 8' bathroom...

One last before and after comparison...
         Before                                                                             After
Shared on Funky Junk's Saturday Night Special

Shared on Tatertots and Jello Weekend Wrap Up Party

I am participating in the Thrifty Decor Chick Before and After Party


Linked on Make it Monday at Cottage Instincts

Thursday, February 18, 2010

Office Space Redesign - Again...

Every time I think I have my office plan finished, Ana at KnockoffWood posts some new furniture plans, and things I thought that were beyond my budget suddenly become do-able, and I keep changing what I want!!!

If you have never been to Ana's blog, then you must check it out!  She designs plans for "knock off" furniture from places such as Pottery Barn, Ballard Designs, West Elm, etc... and posts the plans, material lists, sometimes even exact cutting plans on her blog FREE!!!

And now is an even better time to check her out as she is having a giveaway!!!  If you go to her site, and enter her giveaway, please note in your comment that you hear about her from me - then maybe we can both win!!!  She is having a giveaway to celebrate 1,000,000 blog hits since the start of her blog 3 months ago - as a fellow blogger I can only image that many hits - way to go Ana!!!

So, my center worktable that I blogged about here will be redesigned (slightly smaller) to accomodate two of these...
(image from potterybarn.com)

...that hubby and I will be making - only without the drawers - I just want shelves where the drawers are - at least for now - maybe later I will decide I want or need the drawers and we can make them then.

She has the plans for the basic bookshelf (the secretary pictured above is just 2 stacked on top of each other, with drawers inserted, and a drop down desk) on her site now.  They will fit perfectly on either side of a floor to almost-ceiling window on one wall of our dining room/office.

Now, before she posts another "must have piece" I'd better get to Lowe's and get the supplies I need for these. 

Assuming I don't change my mind another dozen times, I will post pictures of my progress in making these for you when I get them started.

Tuesday, February 16, 2010

PB Inspired Table Lamp

(image courtesy of potterybarn.com)
I saw this lamp in the Pottery Barn Catalog, and loved it, but not the price tag - $105 + $39 for the lampshade.

Then on one of my "junking trips" I found this lamp...
 
Can you see the price tag?


Yes, a whopping $2!
Well, removal of the brass feet (free), 1 can of white gloss spray paint ($2), and one Wal-Mart lampshade ($15) later here is how it looks.


I think I am going to repaint the base in a satin or flat black, but other than that, I really like how it turned out!
Total Cost of PB Lamp and Shade - $144 + shipping
Total Cost of My Lamp and Shade - $19!

This is going to go in my office that I blogged about here where I am also "borrowing" some of PB's ideas!

I am also working on a great chandelier that I will show you when it is done.

I'm participating in DIY Day at ASPTL,
And in the PB Knock-Off Party at Homebody!