Friday, February 26, 2010

The Bathroom Reveal...

This was one of those projects that just seems to take forever.  It was suppose to be a QUICK weekend project.  Well, about a month later, it is for all intents and purposes complete.  There are some areas I need to touch up the paint, and the towel bar needs re-installed (I think one of my kids tried to do pull-ups on it and ripped it out of the wall!)  But done enough that I can post some pictures of it...

Just to remind you what the bathroom looked like before starting this project...
(Before)

 Before I give you the big picture, I want to show you a few of the small items that have made this room.  
The soap and lotion dispensers were cheap $2 dispensers from Wally-World.  I had these vinyl decals made for them by Leen the Graphic Queen.  I did a rough sketch, and she made them look awesome.  You will see lots more of her work coming up.  The toothbrush holder was a gift from a friend.  She too is doing lots of work in her house this winter.  She spotted this when she was at the store looking for stuff for her bathroom, and picked it up for me - Thanks Jenny!  The bathroom cup is an old enamelware mug I picked up years ago and it just looks so cute in there.

All the doorknobs in your house are the cheap, ugly, 60's bright polished brass variety.  It is one of those things I look at all the time, and think I need to do something about, but the thought of spending $20 per knob set (when I would need 14 sets for the entire house ~ $300!) just didn't seem like a good spend.
(Before - ugly brass)
So I turned to my old trusty friend - "Mr. Spray Paint", in an oil rubbed bronze variety, and here is what the bathroom one looks like now...
 (after - Oil Rubbed Bronze)
Not bad, huh?  I am very happy with how it turned out.  If the paint holds up on it, I will be painting all the knob sets in our house!

My $20 Craigslist faucet, that took a whole day to install...


Another small detail that has really made a big difference in the room is the trim...
(before - ugly trim)
(after - metallic silver!)

The flooring also made changed the whole look of the room.  When you have, what I am 99% sure is old vinyl asbestos tile in your house, you have some challenges when it comes to changing the flooring.  If asbestos tile in in good shape (as ours is) you are best to leave it alone, and not take it out.  However, when it looks like this...
you may not want to keep it visible.  This same ugly tile is not only in our bathroom, but a hallway and the laundry room.  We were not ready to change the entire area for a variety of reasons, so we had to do something of a more temporary nature with it just in the bathroom.

So a $17 piece of black of indoor/outdoor carpet, and some double stick carpet tape and a cute silvery grey bathmat, and you get this...
(please ignore the white flecks on the carpet - I forgot to vacuum before taking the picture!)

Lighting also helps to completely change a room... We went from a fixture centered over the toilet with 3 - 40 watt bulbs to one centered over the  mirror with 2- 100 watt bulbs (we put a dimmer on it so that you didn't burn your retinas when you got up in the middle of the night to use the facilities!)

Well, I've kept you waiting long enough, here are the rest of the pictures, of this tiny bathroom in its full glory...

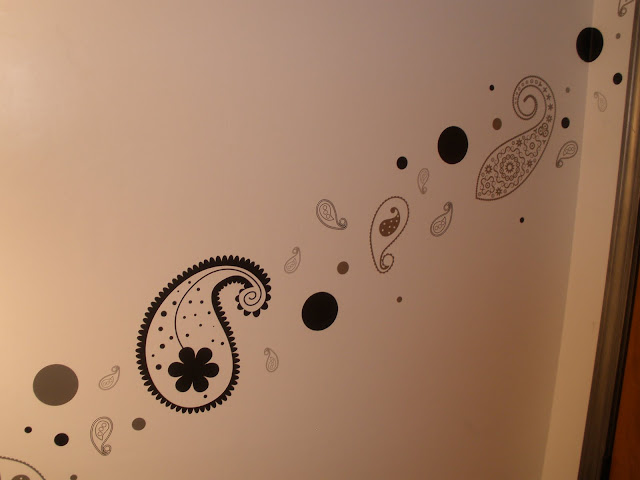
Aren't these vinyl wall decals the best!  Leen made these custom paisleys and polka dots for me.  She did an awesome job - they really complete the room.

And this is the mirror that I designed, had the glass custom cut, had hubby cut the plywood backing, and then I assembled!  I LOOOOOOOVE how it turned out!
Hope you have enjoyed the trip around our 6' x 8' bathroom...

One last before and after comparison...
         Before                                                                             After
Shared on Funky Junk's Saturday Night Special

Shared on Tatertots and Jello Weekend Wrap Up Party

I am participating in the Thrifty Decor Chick Before and After Party


Linked on Make it Monday at Cottage Instincts

Friday, February 19, 2010

A Sneak Peak at My New Bathroom Mirror!

I have completed the mirror for our bathroom re-do.  The mastic needs to cure for 48 hours before it can be hung.  

I can't wait another 24 hours!!!.

This project is extra special because it went from purely a vision in my head to a reality.

You will have to wait until it is hung to see the full piece in all its glory!!  

Sorry!

Come back on Monday - it should be hung by then...

This post is being shared on Miss Mustard Seeds Furniture Friday Linky Party

Thursday, February 18, 2010

Office Space Redesign - Again...

Every time I think I have my office plan finished, Ana at KnockoffWood posts some new furniture plans, and things I thought that were beyond my budget suddenly become do-able, and I keep changing what I want!!!

If you have never been to Ana's blog, then you must check it out!  She designs plans for "knock off" furniture from places such as Pottery Barn, Ballard Designs, West Elm, etc... and posts the plans, material lists, sometimes even exact cutting plans on her blog FREE!!!

And now is an even better time to check her out as she is having a giveaway!!!  If you go to her site, and enter her giveaway, please note in your comment that you hear about her from me - then maybe we can both win!!!  She is having a giveaway to celebrate 1,000,000 blog hits since the start of her blog 3 months ago - as a fellow blogger I can only image that many hits - way to go Ana!!!

So, my center worktable that I blogged about here will be redesigned (slightly smaller) to accomodate two of these...
(image from potterybarn.com)

...that hubby and I will be making - only without the drawers - I just want shelves where the drawers are - at least for now - maybe later I will decide I want or need the drawers and we can make them then.

She has the plans for the basic bookshelf (the secretary pictured above is just 2 stacked on top of each other, with drawers inserted, and a drop down desk) on her site now.  They will fit perfectly on either side of a floor to almost-ceiling window on one wall of our dining room/office.

Now, before she posts another "must have piece" I'd better get to Lowe's and get the supplies I need for these. 

Assuming I don't change my mind another dozen times, I will post pictures of my progress in making these for you when I get them started.

PB Inspired Lamp Tweeked...

I finished my lamp I blogged about the other day. I repainted the base and the metal part that comes up from the lamp "body" to hold the bulb. I sprayed them with an oil rubbed bronze finish spray paint and I lpve how it turned out. Now off to finish another project I hope to show you tomorrow!

Tuesday, February 16, 2010

PB Inspired Table Lamp

(image courtesy of potterybarn.com)
I saw this lamp in the Pottery Barn Catalog, and loved it, but not the price tag - $105 + $39 for the lampshade.

Then on one of my "junking trips" I found this lamp...
 
Can you see the price tag?


Yes, a whopping $2!
Well, removal of the brass feet (free), 1 can of white gloss spray paint ($2), and one Wal-Mart lampshade ($15) later here is how it looks.


I think I am going to repaint the base in a satin or flat black, but other than that, I really like how it turned out!
Total Cost of PB Lamp and Shade - $144 + shipping
Total Cost of My Lamp and Shade - $19!

This is going to go in my office that I blogged about here where I am also "borrowing" some of PB's ideas!

I am also working on a great chandelier that I will show you when it is done.

I'm participating in DIY Day at ASPTL,
And in the PB Knock-Off Party at Homebody!

Friday, February 12, 2010

Center Room Worktable/Partners Desk Plans - Pottery Barn Knockoff!!!

I have been working on several projects around the house since the beginning of the year.  The first is my main floor bathroom that I blogged about here, is almost complete, and I will update you on it when it is done. 

My second project is our home office.  About 3 years ago, we gave up or designated den/office so that our two girls could each have their own rooms.  We moved the office to the least used room in the house, our dining room.  We never had nice matched organized furniture in our office, which didn't really matter, because no one was ever really in there except my hubby and myself.  But now that it has been moved to one of the most visible rooms in our home, it is driving me crazy.

We want a large worktable in the middle of the room where we each have our own space, but can take over the others when needed for big projects for ourselves or when the kids have school projects that need a lot of space.  Also something that could double as a dining table (add a table cloth) when needed.  I found this at Pottery Barn Teens and love it, with the exception of four things.

 Picture from Pottery Barn Teens
  • We only needed space for 2, 
  • We want it in black,
  • The square size would not fit right in our rectangular dining room space,
  • and THE PRICE!!! - $1,599!!!
So being crafty, creative, and cheap I decided to take their idea and make it work for us.  Here is my drawing...


I know it is kind of hard to see, but I will post more pictures as it comes to life...

Here is a picture of the file cabinets we are using for the bases...


I found them, of all places, at K-mart!  For $29 each!  They are MDF, but pretty solid for "assemble it yourself furniture" and even have thick MDF backs (not the carboard tack on back that most have).  I never go to Kmart, but was at Menards the other day getting some stuff for my bathroom project and just had a whim to go across the street and see what they had, and I found these.  They were even black like we wanted!  SCORE!!!
The top will be 4'x 6'  3/4" MDF also painted black, but it will also have 2 drop leaves of each of the long sides that are 1' wide each (thus using the entire 4'x8' sheet, but not taking up too much space in the room when the extra length is not needed!!!  I get the best ideas at 11:30 pm while laying in bed trying to sleep!

I got the idea for the movable table/desk divider last night while laying in bed, and will post more on that as it comes together - it is really one of those things that is easier to describe when you see it!  But just suffice it to say it is Genius, and I already have the main piece I need to make it!

Well, I have 2 more of those file cabinets to put together, so I'd better get to it!  I hope you enjoyed this peak into my creative mind!

This post is being shared on Miss Mustard Seeds - Furniture Feature Friday! DIY Day at ASPTL, and  PB Knock-Off Party 

Thursday, February 11, 2010

Free Gift for All My Followers...

I have written my first pattern!  It is for paisleys I blogged about here and here.


This pattern can be used for a pillow or wall hanging as seen in my pictures, but also for so much more.  How about on a tote bag, or placed randomly on a simple patchwork quilt.  Maybe as appliqued quilt squares.  The possibilities are endless.  As are the color combinations that would totally change the look.

So, for all my current faithful followers (all 10 of you!) and for anyone else who becomes a follower by February 20, you can have a free PDF copy of my pattern emailed to you - just leave me a comment or send me an email message requesting it and I will email you a copy.

This pattern will be for sale in my Etsy shop also, if you have a quilting group who want to use it, or you happen to have someone ask you where you got it, please let them know where they can get it.  The cost will be minimal, but I would appreciate you not distributing it free to everyone you know.  I just wanted to offer it to you FREE OF CHARGE as a thank you for being one of my followers.

It will not be for sale in my shop until after February 20, so if you get a copy and try it out and notice any errors or items that could be explained more clearly, all I ask is that you send me a note so that I can fix it before I list it for sale.  Also, I would love to have some pictures of your original creations so that I can include them too!

Tuesday, February 2, 2010

VEGAS!!!

Had a little get-away last week to Las Vegas.  Dave was out there for work for the week, and I flew in and joined him for the weekend.  One of my oldest and dearest friends also lives in Vegas and we got to hook up with her over my stay. 

 
The stars did not align themselves to allow us to bring home more money then we left with, but it was a good time non-the-less!  

How can you really go wrong when you have...
  • Your husband
  • A good friend
  • Warmer weather than you left at home
  • Lots of lights and glitz and bling all around
  • Good food (that I didn't have to cook - or clean up after)
  • Getting your picture taken with an Elvis Impersonator, an Elvis Big Head, and a walking Fabulous Las Vegas Sign
  • A great hotel room
  • A little gambling (a few wins, but unfortunately we ended up donating it back to the local economy!)
  • The kids home safe and sound with Grandma and Grandpa C
  • Lots and lots of People Watching (one of my favorite sports)
 And the highlight of the trip was the Cirque Du Soleil - Mystère show we saw.  If you have never seen it and get the chance I highly recommend it.  We even had front row seats... AWESOME!!!  You can check out a You Tube trailer for the show here